Need for Single Speed

Welcome

This blog will chronicle my conversion of an old geared bicycle into a simple single-speed. Disclaimer: I am not a mechanic. I do not know what I am doing. I am just a guy with access to the internet and some books who is going to do his best and hope that this all works out. If I can finish up with a functional bicycle, then anyone can; if I fail, then you can laugh at me. It is a win-win situation for you as a reader.

As this site grows, I hope it will be a good resource for other people who want to make this conversion. I will try to collect all of the online information that I use into links on the right sidebar.

Now, let's begin!


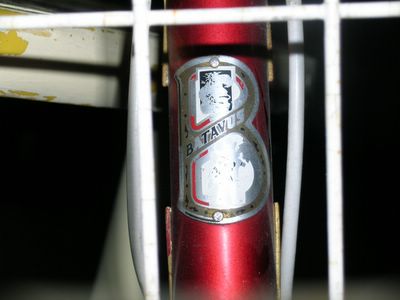
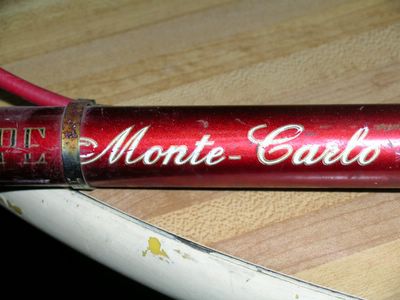
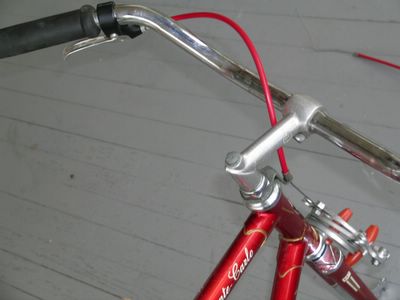
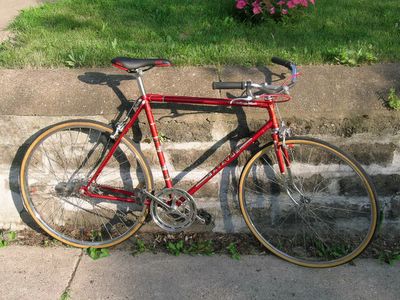
I'm starting out with a beat-up Batavus Monte Carlo (made in Holland!) that I bought on Craig's List. The frame actually is pretty cool looking, though rust-damaged. There look to be no major problems.


Also some rusted nuts and bolts and stuff. The rear tube is thrashed beyond repair, but the tire seems okay. Cables are duct-taped and zip-tied onto the frame. The front brake cable isn't connected to the brake. There is no front derailleur, and the rear one doesn't function.


Looks like I've got some work to do.

part one

After a few hours of research, I was itching to get my hands dirty. It's important to be prepared and to know as much as you can before you start, but it's even more important to get started on the actual work.

The first thing I did was to remove the rack that sat above my rear wheel. I'm going to use that on my other bike that I ride to work. Once that was out of the way, I was able to get at the wheel more easily, but I couldn't get it past the brake. Most brakes have some kind of release, but I didn't find one on these, so I just let the air out of the tube and it slipped off nicely.


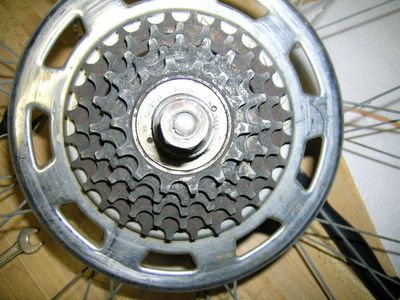
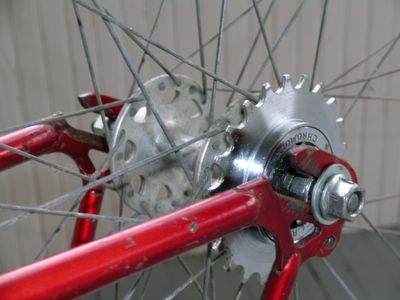
After I wiped off the grease, I saw that I had a SunTour Two-Notch Freewheel. I read that these can be difficult to remove, especially if they are old and dirty, which this one certainly is! If I had a newer Shimano cassette freehub, I could just remove the derailleur and use the existing sprockets. Instead, according to this site, I will need to buy a single-speed freewheel, re-space the axle and re-dish the wheel.

Conversely, I could do something like this. That's the same freewheel that I have on my bike! Sheldon has removed three of the sprockets and replaced them with spacers (read all about it here). I put the wheel aside for now.


The most obvious thing to do would be removing the rear derailleur, since it doesn't work in the first place and I won't be using it anyway. But I didn't have my chain tool handy, so that stays on the bike for now. I did clip the zip-ties that were holding on the derailleur cables, and disconnected and pulled out the shifting levers. I won't be needing those any more!


I took off the wire basket on the handlebars, too. After that, I was ready to enjoy a cold one and call it quits for the day.

part two

I learned a little bike repair on my more modern Bianchi Strada, which seems to use pretty standard metric sizing on the nuts and bolts and screws. I can adjust just about anything on that bike with a little multi-tool and basic wrench set. This bike is more complicated. So far, nearly everything I disconnected has been an odd size; even with my ratchet set, I don't always have the size I need. I should probably get an adjustable wrench!

This morning, I pulled out the seatpost. It was not too difficult to remove, but a bit sticky, just like everything else on this bike. It's going to get a lot of grease and oil and lube when I put it back together.


I broke the chain so that I could remove it and the rear derailleur from the frame. Here's what the pulleys on a new derailleur are supposed to look like. Now closely examine the pulleys on this photo of my derailleur. Can you tell what is missing? That's right: the teeth are entirely worn down! Forget about being able to shift gears with this thing, I'm surprised that the chain could even run through it. Not to mention that the chain itself is all sticky and gummed up.

I didn't have the tools needed for a full disassembly of my bike, so I took it down to Sibley Bike Depot to use their shop for a few hours. With a little help from the regulars, I was able to remove my freewheel, crankset, stem and fork. The frame was completely stripped and I had the components in piles. I thought about taking everything home in pieces for a thorough cleaning but decided to reassemble it at the shop just in case I ran into any problems. Boy, am I glad that I did!

It turns out that building a bike back up is a lot harder than taking it apart. Besides all the parts that had to go back in the same places, I had to make sure that everything was properly cleaned, adjusted, lubricated, and (in the case of some ball bearings) replaced. In the end, we did get my bike back together. I spent about five hours at the shop, but a lot of that time was spent chatting with the diverse crowd that hangs out there. It sure beats a day at the office.

part three

This morning I re-dished my rear wheel by loosening the drive train side spokes and tightening the spokes on the opposite side. Around and around I went, doing one side at a time and then doing the other. I was making half-turns at first, and then I went to quarter-turns when it seemed I was reaching the limits of tightness and looseness. Now it looks a lot more like the front wheel, but it is hard to take a photo, so you will have to take my word for it. The drive side is still "flatter" than the other, but maybe that is okay; I need to get the freewheel on before I can make all the necessary adjustments for chain line.

Next, I need to buy a single-speed freewheel to replace the geared one that I had on originally. Except for a new chain to replace the gummy old one and a new tube to fix the flat in back, this is the only thing that I need to buy (I hope)! I think I will use a 20-tooth freewheel, which is on the large end of what tends to be available. It's time to make some phone calls.

County Cycle in Roseville is where I like to buy most of my new stuff. I ride past it on my way to work and the employees are always friendly and helpful. They stock three brands and many sizes of SS freewheels but don't have any 20-tooth ones right now. A girl at Woodbury Penn Cycle said that the Lake St. location had one showing up on the computer, but they were unable to find it when I called over there. I also tried The Hub and Erik's, but neither of them even stock the size that I want.

Finally, I called One on One and it didn't sound like I would have any luck there either. They had 16 and 17 tooth freewheels available, but couldn't find anything larger. Just as I was about to hang up, they told me that they had found one ACS 20-tooth freewheel and I could have it for $20. Score! Only problem was that they were closing for Saturday and wouldn't be open again until Monday.

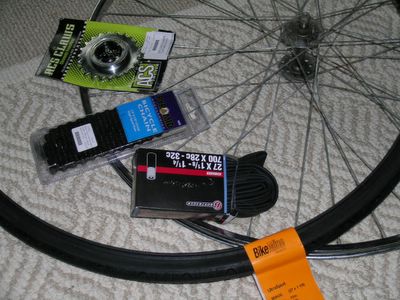
But wait--then I called Freewheel on Sunday, and they had the same thing in stock, plus they were open. Time for a trip to Murderapolis! I bought the freewheel, a new tire and tube for my front wheel, and a new chain to work with that new freewheel.


Too bad I got all the wrong stuff and didn't realize it until I got home. The chain is 1/2x1/8" and I wanted to buy a 1/2x3/32" chain. 1/2x1/8" chains suck. The tire is 27x1 1/8" inches for hook type rims only and I have a hookless 27x1 1/4" wheel. Okay, the freewheel and tube are fine, but I have to exchange half the things I bought, and that sucks. On the other hand, I think I learn more from my mistakes than when everything is going well.


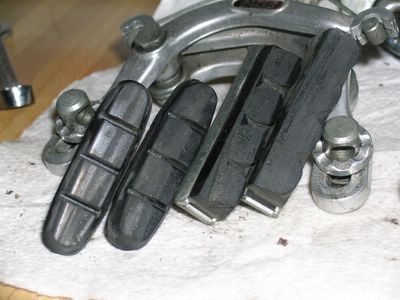
Speaking of replacement parts, check out the wear on those brake shoes! You can see the progression here, which means that they weren't being used equally. The one on the far left looks brand-new, but its twin is worn down pretty good. The one on the far right has been worn almost to nothing! Add that to the shopping list. This is getting more expensive than I anticipated. But, as long as I end up with a functioning single-speed at the end of this, it will be worthwhile.

part four

I rode my Strada during lunch at work and forced myself not to shift. The gear I used is very close to what I will be running on the Monte Carlo, and I wanted to see what it felt like. Maybe I should have done this before buying the freewheel, but I got lucky and it is a combination that feels good for going up and down hills. After work, I returned to Freewheel to exchange my tire and chain. The new ones were cheaper! Also, I bought new brake pads.

At home, I put the tire together and cleaned some of the metal components with Naval Jelly and a citrus cleanser/degreaser. They look a lot better, but they're still dull and somewhat rusty. Good thing I don't care about how good the bike looks as much as how well it works.

With the help of more Naval Jelly, I scrubbed the rust right off my handlebars and now they look shiny and new; it makes a huge difference on the overall appearance of the bike. I scrubbed and washed the frame again and then applied a coat of carnauba wax to make it shine a little. I took probably a couple three hours total to clean everything up real nice, and still, the paint job leaves something to be desired, there are spots of rust that I can't remove, and duct tape around the seat tube.

Anyway, it's not going to be the prettiest bike on the road, but it looks a heckuva lot better than it did when I bought it. After cleaning, I reinstalled the brakes (with brand-new brake pads) and thought about reconnecting the brake cables. But it was getting late and I don't have the proper tools, so I called it quits for the night.

part five

A gummy mess was left behind when I removed the duct tape that was holding the front derailleur cable onto the seatpost. Today I borrowed a Goo Gone substitute and bought a pack of "very fine" #00 steel wool. Bunch "O" Bikes used #000, but the kind I got was recommended for polishing "bright metals" and it worked great. You can see all the gunk that was on there before and how it's all been wiped clean with nary a scratch!


After cleaning that crap from the frame, I moved on to the crankset and polished up the big 52-tooth cog as well as I could. Then I buffed a bunch of rust off the rear wheel and adjusted the brake pads. I'm just about done with all the major cleaning that I wanted to do at this point, so tomorrow I will move on with the reassembly and conversion work. I'm excited to complete my project and get this bicycle back on the street!

part six

This was my most fun day yet! I took a few days' break from the project and came back to it fresh (which means that yes, the Days in my post titles are not necessarily consecutive). I was starting to feel bogged down in what had to be done, but after setting it aside for a while, I was eager to start working again. Wednesday is volunteer night at Sibley and one of the few times that I can make it to the shop with my job schedule. I brought the bike down in pieces and tried to get it all put together again.

Unicycle lessons were in progress when I arrived, so I claimed an out-of-the-way stand and watched a girl try to ride this funny machine while I worked. The first step was to remove my crankarm to take off the unnecessary 40-tooth cog. It was much easier this time. Now I only have the 52-tooth cog in front and the 20-tooth freewheel in back. Nice & simple.


After getting that spare part out of the way, it was time to reinsert the seatpost. Big dollop of grease in the tube, generous portion slathered on the post, slide it in and clamp it tight.


The next task, a more difficult job, was to finish dishing and truing the wheel and respacing the axle so that the wheel is centered and the freewheel lines up with the cog. In other words, chain line. Dishing on this wheel has been less than ideal due to the age and quality of the wheel and a couple three stripped nipples. To my horror, I discovered that I had also been inadvertantly making the problem worse by using the wrong size spoke wrench--the nipples on the Batavus are slightly smaller than the ones on my Bianchi.

It would probably be best to replace the worthless parts and do a proper job, but I have no skill or knowledge of wheelbuilding and didn't want to undo something that I couldn't fix. I did the best I could with what I had. While I worked at the truing stand, I met a volunteer whose sister rides a Batavus with top tube that looks a little something like this.

The shop was starting to fill up with volunteers working on bikes; one group was assembling an orange Pedicab. The parts came in several large boxes with no instructions or illustrations of the finished product. Now that looked like a big project.

After taking a break to grab some popcorn, I got back to my own bike. Loosening up the stuff on the axle wasn't as difficult as I feared, so I got everything loose and stuck the wheel in the frame to eyeball my new fit. With the help of some new spacers from the parts bin, I centered the wheel and chain line as best I could, and re-tightened the axle parts.


I assumed/hoped that this would not affect the balls inside that make everything work smoothly, but when I got home that night and checked my work, the wheel was spinning roughly. I can hear what sounds like something little clacking around in there when it spins (I also forgot, again, to put the spoke guard back on!). I'll probably need to take it all apart again later, but I was unaware of this problem at the shop and moved on to my next job--cooking weiners!

While I supervised the grill on the outside deck, I talked with Tom, who I have now seen around the Depot on several occasions. He's in the market for a new bike but meanwhile was replacing some cables on his ride. I showed him my project and someone else took over on weiner duty. Then I started the real fun of the night, which was trimming and routing my own brake cables.

It should have been a relatively simple task, but I took a long time doing it. The housing and cable for my front brake were completely disconnected when I purchased the bike, and also extremely long, so I had lots of options. Plus, of course, I wanted to make sure I did it right. I looked at some other bikes in the shop to get ideas for where the front cable should go and how short to trim it. Finally I snipped the housing to the length I wanted, which crimped the end shut, which I had to trim and file and pry back open. I reinserted the cable and trimmed it, but the end was badly frayed and I couldn't get it through the brake's little cable-grabber thingie (highly technical term).


At last I found a good sharp wirecutter and made a clean cut, threaded everything where it should go, and tightened it all up. Looks pretty decent, if I say so myself. I didn't have time to reinstall the rear cable, but I put both the tires on and got the brakes in basically the correct places. I left the shop with a big sense of accomplishment. I tried to attach the chain at home that night but--once again!--I didn't have the chain tool that I needed to take out all the extra links and get it down to a trim one-speed size.

Reckon as I've got a few days of work left, but I'm a lot closer to having a rideable bike than I was the day before. The end is in sight!

part seven

I screwed something up for a very stupid reason: failure to comprehend directions. It's not that I didn't read the instructions that came along with my Z chain. I did. But I didn't quite understand what they were trying to say and I went ahead anyway and did something that I knew was probably a bad idea. I took out too many links, and I can't get them back in without jacking the works, so my brand-new $8 chain is now worthless. Crap.

Well, it had to happen sooner or later, and it least it's something that's easy to fix, by simply buying a new chain.

Spoiler alert: I'm going to finish the bike tomorrow.

part eight

I had five hours at the Sibley Bike Depot for Saturday and decided that it would be a good time to finish my bike. It was close, but I pulled it off. Here's what I did.

Job one was fixing up my rear wheel. I clipped out three or four spokes with stripped nipples and threaded in new spokes, which was a long process. I had to bend a couple of spokes to work them through, and then bend them back as much as possible before securing them to the rim. It wasn't as difficult as I feared, however, and now I have a little wheelbuilding experience on my resume. Next, I threw the wheel up into the truing stand and got it pretty well straight. Then it went back on the bike along with the front wheel.

Rear brakes came next. I trimmed back the housing by a few inches and clipped it back on to the top tube. Remember that rusted cable fastener from the very first day? Here's what it looks like all cleaned up.


Much better! Two of those clips hold the cable onto the frame, and then it threads back around the seatpost down to the brake. Here's how that looks after the cleaning and rerouting.
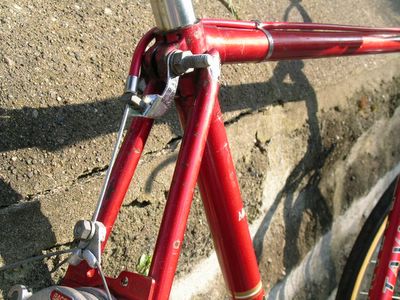

Now that I had the rear and front brake cables connected, I messed with tension and tried to get the brake pads all lined up with the rims for maximum stopping efficiency. Like all the moving parts on this bike, the brakes, levers and cables will need a little tweaking to get perfect. For now, they're fine.

At this point, I almost had a complete single-speed bike. The only thing missing was a chain! I was handed a 1/2x1/8" chain, but remember kids: Surly (who know what they're talking about when it comes to SS and fixed-gear bikes) recommends 1/2x3/32" chains for single-speed drivetrains. I got a Pyramid chain, which doesn't have any of that wacky masterlink hoohah and just works like a good chain should: every link can be taken out and stuck back in. I took out a few links and put it together again on my bike.
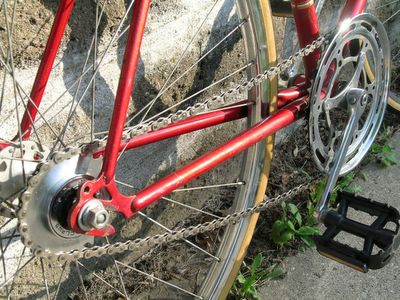

(note: the chain is way too loose as seen here, and would probably pop right off under serious acceleration. I removed a couple of links and got the tension just right after taking the photo.)

Time to ride! I pumped up the tires to the maximum recommended PSI, double-checked the brakes, wheels, and seatpost to make sure they were tight, and jumped on for my first ride on the Monte Carlo. I was happy to see that it was the correct size (since, you will recall, like an idiot I didn't even measure the seatpost or swing a leg over before I bought it). I was sad to be sitting on the saddle that came with it. It was one of the most uncomfortable things I have sat on, ever.

But I didn't think about any of that while I rode my bike around the block. It was a beautiful and glorious time. I could go! I could stop! I was beaming when I returned to the shop, but my joy was briefly interrupted when the front wheel exploded with a loud BANG!--making everyone jump. It took a while to even discover that the sound had originated from my bike, what with all the echo.

I was advised to let the air out of my rear tire fast before it went off too, and inflate them up to about 60-70 PSI, even though the tires are rated up to 90. Something about the heat making them inflate. I replaced the (brand new, Bontrager) tube with a Pyramid one from the shop after checking the rim for other problems. Everything looked fine, but I'm concerned. After all, the front tube was blown out when I bought the bike! I hope that this does not become a recurring problem--I have already spent on tubes half of what I spent on the bike.

Anyway, I fixed the tube and put the tire back on and pumped both tires up to a flaccid 60 PSI. There was only one thing left to do, and that was to replace my seat with something that didn't feel like this. Luckily, the shop had gotten a sweet deal on some new saddles and I bought one at wholesale price. I went for another ride around the block to test it and the tires, and everything was good this time. The new saddle was way more comfortable than the old one, but most importantly, it matches the bike!
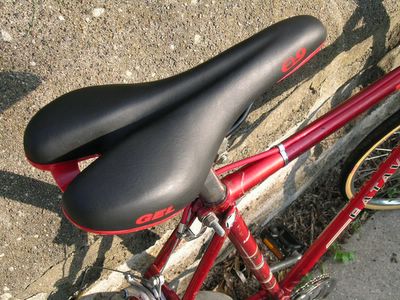

I paid for the chain, seat, and tube, and went home with a functional bicycle. Like I said before, it needs some fine-tuning before it's perfect, but the major work is out of the way--for now, at least. Well, that wraps up my conversion story. I hope you learned something, enjoyed the page, or at least killed some time at work.

THE END?

Jahaa, het is een Batavus!

Along with learning how to convert a geared bike into a single-speeded one, I have also been researching the Batavus brand to understand my bike's heritage. Information in English is scarce and elusive. I'll gather everything that I find out here. Please let me know if you know about the brand, have something to add, or see a mistake!

Batavus is an old, Dutch bicycle company that exported bikes to America during the 'bike boom' of the early-to-mid 1970's, but which now only sells them in the local European market (hence no option for English language on their official website). It sounds like Batavus is still a major player in Europe and you can see on their website that they currently offer a huge variety of bicycles. Any number of Google search results will inform you that "Batavus is now part of the Accell Group, a bicycle conglomerate quoted on the Dutch stock market." They also used to produce mopeds.

There's an interesting tale in this forum thread at bikeforums.net:
The name stems from the 'Batavieren', who peddled down the river Rhine (long before BC) in hollowed out tree trunks, and inhabited the swampy Rhine delta by the sea, the low countries, for the first time. As the story would have it!
s70rguy adds, "Untill recently there was a pro team sponsored by and racing on Batavus." I failed to find any photos or interesting information about that.

I brought my Monte Carlo to the Sibley Bike Depot, and a couple of the older guys there remarked on it. I was proud to hear that I had purchased a "nice old Batavus," and another man remembered when they were still being sold in the Twin Cities. He guessed that my bicycle was an early 70's model itself.

Internet information is harder to come by, but it's scattered out there. Most of the extant opinions about Batavus bikes are either neutral or bad. One bitter ex-Batavus owner has condemned the company in a clever blog post and vows, "never again." This person briefly mentions "the Dutch Batavus bicycle, reknowned for it's weight and lack of style." Are you kidding, man? The Monte Carlo has style for a mile!

Speaking of my bike, I couldn't find much information about the Monte Carlo model, but there are a few others out there, and the owners have good things to say about them. Stella rides her Monte Carlo to law school and claims that it is a touring bike. Another proud Monte Carlo owner modified his bike slightly. He writes, "I also put a shorter front fork on it and it still accepts the stock wheel and tire. The thing handles like its on rails".

About my bike: lugged frame (steel, I presume), Racer cantilever brakes, Suntour freewheel, Allvit rear derailleur, wheels made in Japan. Brake levers look non-stock and for everything else I have no freaking clue, so don't ask.

Additional links:
Fixed gear Batavaus Monte Carlo (see here for more Batavus fixies)
This entry in the fixed-gear gallery looks so good, I could eat it!
Two Batavus roadsters are in this gallery
Someone else who bikes instead of blogging
The second result in a Google image search for "Batavus" was this un-work-safe ad
Funny and weird Batavus commercial
More Batavus history on Classic Rendezvous.com
A Batavus Professional painted by Joe Bell of Rivendell Bicycle Works
Is this one of the legendary Batavieren?